Quick start
This quick start guide provides an overview of how to use DataSync to sync a local CSV with a dataset.
NOTICE: The steps in this guide will replace the entire contents of the dataset with the contents of the CSV. For a more in depth guide of using DataSync, including information on how to use DataSync to update and append information to a dataset, please see setting up a standard job.
Step 1: Download DataSync
Navigate to the DataSync download page, and download the latest version.
Step 2: Launching DataSync
Launch DataSync navigating to the folder containing the Datasync JAR file that you downloaded previously and either double-click the jar or run the following command:
java -jar <DATASYNC_JAR>
Step 3: Enter authentication details
Enter your authentication details (domain, username, password, and app token) at the bottom left of DataSync. The domain is the root domain of your data site and must begin with https:// (i.e. https://opendata.socrata.com). The username and password are those of a Socrata account that has a Publisher role. Enter your App token. If you do not yet have an app token, please see how to obtain an App token. The username, password and application token will be saved as part of the job configuration. We recommend creating a dedicated Socrata account (with a Publisher role or Owner permissions to specific datasets) to use with DataSync rather than tying DataSync to a particular person’s account.
NOTICE: DataSync stores the authentication details unencrypted in the Registry on Windows platforms (in the following location: HKEY_CURRENT_USER\Software\JavaSoft\Prefs) and in analogous locations on Mac and Linux. If you are concerned about this as a potential security issue you may want to look into alternative publishing methods. Please contact support if you have questions.
Step 4: Enter job details
Choose the CSV or TSV File to Publish
Select the CSV or TSV file on your local machine or networked folder that you wish to publish by clicking the “Browse…” button and browsing to find the CSV or TSV file.
Obtain and Enter the Dataset ID …
You will need the identifier of the dataset (dataset ID) that you want to update. To obtain the dataset ID navigate to the dataset in your web browser and inspect the address bar. The dataset ID can be found at end of the URL in the form (xxxx-xxxx). For example for the following URL to a dataset:
https://data.seattle.gov/Public-Safety/Fire-911/m985-ywaw
The dataset ID is: m985-ywaw
Enter your dataset’s ID into the Dataset ID field.
Choose the Publish Method …
Select the ‘Publish method’ by selecting one of the following options:
replace: Replaces the dataset with the data in the CSV/TSV file.-
upsert: Updates any rows that already exist and inserts rows which do not. Ideal if you have a dataset that requires very frequent updates or in cases where doing a complete replace is problematic.IMPORTANT NOTE: For updating to work properly you must set a Row Identifier for the dataset. If a Row Identifier is not set then DataSync will not be able to determine what rows to update and all rows in the CSV/TSV file will be appended to the dataset. Learn more about Row Identifiers and how to establish them.
delete: Delete all rows matching Row Identifiers given in CSV/TSV file. The CSV/TSV should only contain a single column listing the Row Identifiers to delete.
Tell us how to import your file …
Click the “Map fields” button to launch the screen where you’ll map the items in your CSV to the items in your dataset
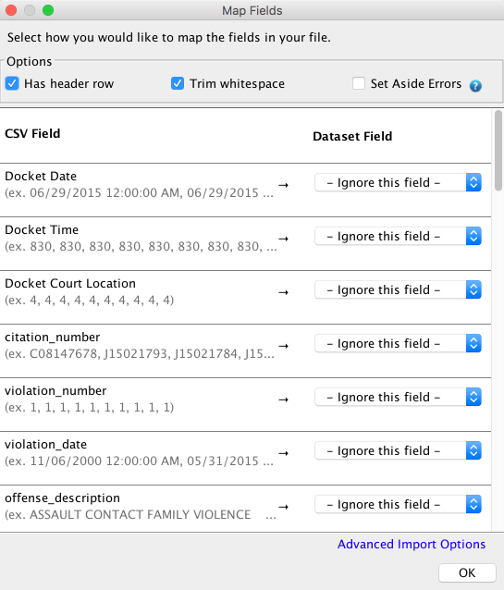
You can use this dialog to map the columns in your CSV (shown with previews in the left column) to the fields in your dataset (selected with the dropdowns) on the right hand side. This dialog will automatically attempt to detect the names in your CSV and align them with the names of your dataset. Because of this, most of the time you’ll simply need to double check the values and hit “OK.” If that’s not the case though, you can use the boxes on the right to select the dataset field names and then hit OK. The dialog will check the values of the CSV to make sure that they are valid and if they are will generate a control file automatically for you under the covers. If not, you’ll quickly get an error message with instructions as to how to fix the error.
For more information on the advanced capabilities of this dialog, please see the Using the Map Fields Dialog
Step 5: Run the job
Run the job by clicking the “Run Job Now” button. A loading spinner will appear as the job runs. The length of the job will depend on the size of the CSV / TSV uploaded. Once complete, a popup will indicate if the job was successful or notify you of any errors.
Step 6: Save the job for later use
If the job was successful you can save the job to a file on the computer by clicking “Save Job” and selecting a location to save the file on your computer (job files are saved as .sij files). When saving your job we recommend choosing a filename that does not contain spaces (e.g. ‘my_job.sij’, do not use a name like ‘my job.sij’).
After saving the file the ‘Command to execute with scheduler’ field is populated with the command to run the given job. Customers can use this field to run DataSync from the command line on a scheduled basis. You can later open a previously saved job by going to File -> Open and finding the job file you saved previously.
NOTE: You should always close DataSync after you are finished. Failure to do so may cause issues when jobs are run using the scheduler.
To automate updating a dataset you must schedule the DataSync job to run automatically at a specified interval (i.e once per day). This can be done with standard tools such as the Windows Task Scheduler or Cron.